Saturday 10 November 2012

Worn to MCM Expo London and Cardiff Comic Con!


Credit for the above 3 go to mega_eye on flickr. Heres the full sets from the con! http://www.flickr.com/photos/digviz/sets/72157631885178950/


I had so much fun wearing the cosplay and met so many great people! Thanks so much guys!!

I also wore it the Cardiff Comic Con the following weekend where I won the cosplay prize! I was awarded around £150 of goodies, which has essentially offset the cost it took to make this in the first place!!


Tuesday 14 August 2012

ITS FINALLY FINISHED!!

I never thought this day would come. Its basically finished 8D I'll probably tinker with the wig and make a few adjustments so its more comfy to wear...yay =^.^=

Monday 13 August 2012

The end is in sight!!


Few update pics! I'm now just waiting on some wire to arrive in the post so I can attach some beads, a couple of things to the wig and then I'm done >.<

Friday 10 August 2012

Day 40

Wow. I am so sorry for not being able to post for a long time. I have been doing bits and bobs for the cosplay since I last posted so I shall update!
I have purchased my ears and blue contact lenses! I haven't tried the contacts yet but the ears did need some work. I got the offical LOTR latex ear tips as they had pretty good reviews. They fit well etc etc The only catch is that their this horrible sickly pale colour that I think must be humanely impossible to actually be!! So I have painted them a more flesh colour :)
I have finished the shoulder pieces for the armour and just need to weather one. Here the before and after pic :D I have also attached velcro to the inside of these and corresponding ones to the dress.
Today I also did the neck piece 
I'm just waiting on some thinner wire to attach the beads etc

I have also been doing work on the wig and its about half done. Now all I need to do is the last piece of jewellery and the wig then I can fit it together >8D Mwahahahaaa. The end is in sight!!

Wednesday 1 August 2012

Day 29

Hey!!
I'm now about half way through the armour, getting ready to paint and decorate!
A petticoat also arrived in the post today, but I'm not sure I'm happy with it, I think its too big.


Thursday 26 July 2012

Day 23

One last post before I leave for my bfs. I shall be back next Monday or Tuesday, hopefully with the armour :)
Today I hemmed and finished the jacket and have started painting the border design on. I shall do that back when I return as I need to let the front dry for 24 hours. See you guys!

Wednesday 25 July 2012

Day 22

Progress pics!
Done the gloves! The artwork is REALLY unclear on these so I took elements that I could glean and made the rest of the design up
 Tiara is now one piece!
 Annnnd finally I have hemmed and everything elsed the top but I'm just waiting on the zip. (I shall then give it a really good iron and paint the designs on the border!!)

Tuesday 24 July 2012

Day 21

AAANNNNND I've hit the first problem. With the purple jacket.

To interface or not to interface, that is the question. I'm worried how it will sit with and without, how the seams will look etc etc. I ordered medium weight, and it seems to be A LOT thicker than all the other 'medium weight' ones I have received. So either way I'm going to have to bite a bullet. Do I rip it out now and hope for the best, or sew it in and hope for the best D:

-Update-
I've made it, WITH the interfacing still in. It hasn't turned out as bas as I thought and hopefully it'll soften up with a wash or something :)
Heres the semi-finished product (Needs a zip and an iron etc)

Monday 23 July 2012

Day 20

Did the painting today. I am quite pleased with it but I had to edit the design a little at the bottom because when I sketched out the proper one it looked a little squished and not very nice D: I will probs still do a couple more coats in some areas and neaten up some edges

Sunday 22 July 2012

Day 19 - With Gradient Dyeing tips


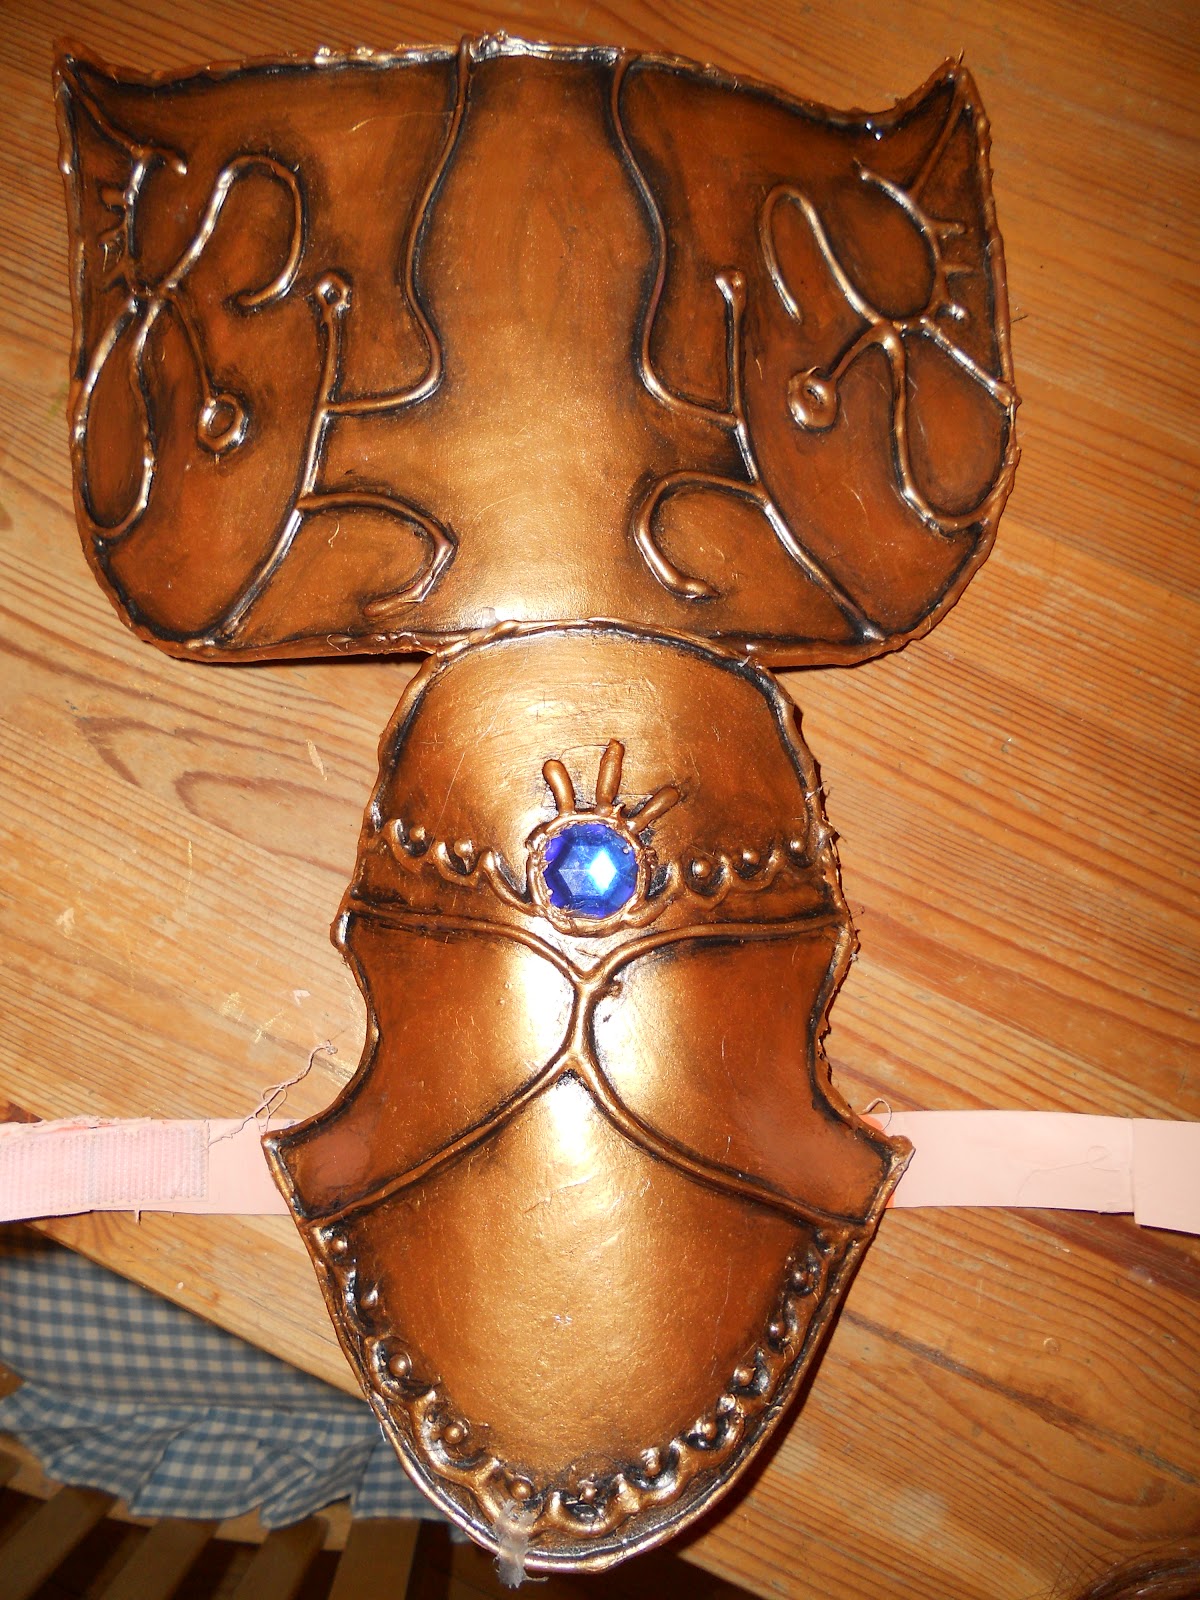
Well, I was working Friday and Saturday all day so I didn't have a chance to get much done except a few things in the evenings. The front of the tiara is now all glued as one piece and has the gem in place. To do this I used epoxy glue. 
(Excuse the creepy expression) 

Today I did my gradient dyeing. I've been waiting to do it outside because my Mum would have slaughtered me if I stained the kitchen tiles -_-' Unfortunately it literally rained everyday last week so I was only able to do it now. 
This is the final product drying on the washing line.
 And this is the first attempt that I really buggered up :/
 And this is a result of my being forgetful and not methodical
So I've decided to write down a couple of tips that I found quite useful today. First of all this is the tutorial I used: http://www.youtube.com/watch?v=IO4_ghePq9E This girl seriously makes it look so easy XD But it looks like shes done it a few times before and has a lot more control than I :/ Also in this video shes using a light pink dye (on a bit more fabric) which I imagine isn't as potent a colour as my navy blue one -_-' So heres the tips! Some of them may seem really obvious, but I kept forgetting to do some of them, hence the splodges.

1.The failed one was because I did the 1/6th bottle that she suggested and dunked it in. It was seriously a lot stronger than I had thought, it was not a 'very pale solution' because this is not a pale colour! This resulted in a really harsh dyeing line and not the nice smoothness I wanted so I used some spare fabric and started again. In the end I used about half of the bottle  3/4 bottle including the re-dye to make it darker. (I've got some left just in case I need to do it again, if the design doesn't cover up the splodges, which I think thankfully it might.) Also I did this one bottle cap of dye at a time, to ensure I didn't over do it.
2. Do it in your garden if your not used to this process, in the end I made a fair bit of mess!
3. Be careful of splash back when putting your bottle cap of dye in. First of all in your face :P, and second of all up the sides of the bucket. Just rinse the sides of the buckets before dunking it in, the fabric WILL stick to the side of the bucket.
4. Keep a bucket of clean water nearby to RINSE YOUR GLOVES EVERY TIME YOU STICK YOUR HAND IN THE BUCKET OR TOUCH THE DYE BOTTLE!! Its because I forgot to do this that I ended up with splodges where I'd been holding it (and the sides of the bucket thing.)
5. And finally, literally dunk it and keep moving it up and down to keep the dye even and to reduce the risk of heavy lines. Also go over previous areas slightly when the dye gets a little more concentrated. This will help keep it smooth! Don't just let it sit in the dye, keep it moving.

Well I hope the helps. If you have any questions about this process, please ask!

-Update- Its just come off the line, and it was a lot lighter than I expected so I've done it again with a more concentrated solution this time just to darken it a bit!

Thursday 19 July 2012

Day 16

Front of the tiara has been fired and weathered :)
Then I started to glue it to the wire with epoxy resin. This stuff REEKS D:
I also started on the design that goes round the bottom of the dress :)


All in all, a rather productive day!

Wednesday 18 July 2012

Day 15

Finished the front of the tiara in fimo...not sure whether to just scrap and start again :/

Tuesday 17 July 2012

Day 14

Wow, its been a long time since I last posted XD I have been away for about 5 days so I haven't been able to do anything in terms of the cosplay.
I've finished off the dress and am now onto hand painting the border. When drawing the guidelines I was panicking that the hexagonal pattern wouldn't match up and I'd have to fiddle about with it at the end to get it to join. But, by some fluke it was exact O.o The Goddesses of Hyrule must be smiling on me! Its also not as tedious as I expected, in fact its quite therapeutic ^.^
I love it when a plan comes together!


Monday 9 July 2012

Day 6

I've nearly finished constructing the under dress!! I am now in the process of hemming it and I need to take it in a little on the bodice. Then I can start the painting!!

Saturday 7 July 2012

Day 4

Progress so far. The dress is actually beginning to look like a dress :)

I've hit the first problem: the back. If you look closely at the reference pictures (often hid under her braid) the back of the dress is cut into a V shape. My pattern isn't, its just square. The risk is if I cut it to shape the dress will loose its shape, won't sit correctly or the straps may fall off my shoulders etc etc I will take the plunge and do it, but I may have to troubleshoot later as well if any problems occur :'(


Tuesday 3 July 2012

Day 1

Just a quick background. I have never sewn before, never used a pattern, sewing machine, or fimo or many of the other materials I am going to have to use for this project. So why I thought it would be a good idea to make Princess Zelda's costume from Zelda: Twilight Princess I do not know.
So as this is my first time making a cosplay, I'm not expecting much from myself XD

I've got half of the white underdress made already, thanks to my Mum's help. She helped me with the pattern and then told me too go and stitch it all together. My face => D'8

At the end of the first day: Nearly finished white base dress. Need to sew the back to the front and put in zipper. Then just need to neaten it up!